Showing posts with label projects. Show all posts

Monday, November 28, 2011

I'm dreaming of a white Christmas


That's right-
this year I've envisioned lovely vignettes of white pinecones, berries, ornaments, trees, and all things Christmasy. My hubs has talked me into having a real tree this year (with the agreement that HE cleans up needles off the floor each day) and I'm actually excited about it! We've always done a faux tree, but if you've seen pics of real ones, you know they're quite pretty. No...gawgeous.
They're gawgeous.
However, I don't want to junk it up with all of the hulabaloo that I usually put on our faux tree, so....
I'm going a more handmade, rustic route with everything this year.

While searching Pinterest for 'White Christmas' inspiration, I came across and fell in love with a white berry wreath so, naturally, I had to try and re-create it. This begins my 'Week of Christmas Crafts- 2011', and I'm starting out by saving a whopping $51 bucks.
Did you hear that internets?
I SAVED $51 dollaroonies by makin' this myself.
The one I found on etsy was $70 and I was able to pick up the supplies I needed for my own at a cool $19. While they aren't identical, I'm totally in love with my own now.
Totally.
Here's my version:

**updated**
I totally added a ribbon


and here's the one I pinned from etsy:


And yes, I could totally add a bow to make them even more twin-like...

Here's what I used to make it:


14 white berry stems from Michael's at 50% off= $14
1 wired wreath form= $2.99
1 spool of floral wire= $1.99


In short, all I did was attach each of the stems to the wreath form with the floral wire, and since the wreath form started out dark green, I also used some white acrylic paint I had on hand so it would blend in.


p.s. Do you like my manicure? I call it 'taupe-with-a-tip-of-white-acrylic'
and...that's the backside of the wreath form. See how that green sticks out like a sore thumb?


Thar she is with 2 stems attached.
By the way, you'll need some of these bad boys to clip the long stems off since they're not needed-


They're called wire-stem-remover thing-a-ma-bobs.


Forgot to mention that it may also be helpful to have a 2-year old who refuses to go to sleep because she just wants to 'help'.


Even before the 2-year old goes to sleep, the wreath will be done because it was just so darntootin' easy.


For now, it's in the foyer on the Narnia closet door. I'm thinkin' I may go back and make it a bit fuller by adding in more stems, but who knows. I could grow to love it in this skinny state. And speaking of NOT skinny, I'll be dieting until I get this turkeyhamdressingcasserolepie gut off of me. I'd love to say I'm kidding when someone asked yesterday when I was due, but I'm NOT.
Someone actually asked me when I was DUE.
I know this is neither here nor there in regards to the lovely wreath above but I felt like sharing.

Anywho....
I hope you have a most excellent Monday!
I'll be back tomorrow with something else I'm creating for my 'white, light, and bright' decor.

And yes-
extra bonus points if you immediately spotted the plastic Easter egg in the pic above. It just wouldn't be right if a random toy didn't make it into at least one of the shots.

**********
I've linked this post to:

Tip Junkie handmade projects
Home Stories A2Z

Get Your Craft On at Today's Creative Blog,


Photobucket 
The Crafty Lassy Linky at Sew Stylish Boutique,
Whatever Goes Wednesday at Someday Crafts,
Show and Tell at Blue Cricket Design,
Kate's Holiday Crafts linky at Centsational Girl,
Photobucket

Monday, September 26, 2011

Fall is in the air and on the mantel

Happy Monday friends!
Hope you all had a lovely weekend!
I have lots to share about ours, including an adventure with some friends to see Les Miserables on Friday night,
but first,
it's that time again:


Will any of you be joining these partays?
Can't wait to be inspired by other's creativity.

Since Layla's mantel party is tomorrow, I'm sharing mine today:


I spent zip, zero, zilch on this mantel, which makes me love it all the more.


black vase, florals + berries, pumpkins= all from hob lob in years past


black mirror from Kirklands is back after a short hiatus in the master bedroom,
large 'M' is from Jo-Ann's,
and the felt circle garland is something I whipped up Saturday morn-

I grabbed these supplies that I already had on hand:


wool felt in fall-ish shades (from hob lob),
pumpkin & white twine,
great big needle,
scissors

I free-handed several circles out of each color-


and strung them together with the twine-


and that was all she wrote.


Done.


Here's a quick reminder of what the mantel looked like
before:


Did you notice something else missing?
Besides that orange ball peeking out from underneath those logs?
Those logs that are just posers in that fake fireplace?


That's right.
Fake.
Total fakeness going on.
I removed the logs and hideous gold log holders because,
quite honestly,
I have no idea why I kept them there so long in the first place.
It was rank-nasty underneath that stack of wood, so good riddance is what Ima sayin'.
You with me?

I'm thinking that new, open space down thar would look fabulous with some pumpkins or a stack of vintage suitcases.
Yes, two completely different looks.
I know.

Of course, it means we'll no longer get to enjoy this:


but it also means no one's gettin' an eye poked out with those pointy gold hazardous could-probably-be-used-as-a-weapon log holders.

They're up for grabs now, along with Mr. Shower Bear.
Any takers?

p.s.- I'll be back later today to share something super exciting that's taking place this Saturday. It may be the reason that I've been craftin' off my bootay lately.
squee!

********************

I've linked this to:

The Lettered Cottage

Made by You Monday at Skip to my Lou,
Met Monday at Between Naps on the Porch,
Craftomaniac Monday at Craftomaniac,
Mad in Crafts Mad Skills Party,
Market Yourself Monday at Sumo's Sweet Stuff,
Tutorials and Tips at Home Stories A 2 Z,
Anything Goes at Type A Decorating,
Tip Junkie handmade projects

Monday, August 8, 2011

how to make an easy-shmeezy pillow cover

Happy Monday friends! Hope you all had a fantastic weekend!
I'm finally getting around to posting  a tutorial for the pillow covers I made for our playroom sofa a few weeks back, and since I didn't take pictures while I was making those, I thought I'd demonstrate with the lovely black and white chevron ones that I made for a recent giveaway.

(I'll be making 18" x 18" pillow covers, FYI, so this will have to be tweaked a bit for other sizes)

1. Start with a piece of fabric that's 19"x 42" Fold over the ends of each side one-half inch to an inch, and press-
which will look like this:


2. Sew these edges down to make them secure-


3. Place the fabric face up on your work surface-


and fold one half over about 12" inches-


Now fold the other side over until it measures 18" all the way across-


4. Pin all the way down both sides-


5. Stitch a 1/2" seam down both sides


6. Flip right-side-out, and you are D-O-N-E

I was, of course, making two at the same time-


nope, make that 3...

Still working on changing up our master bedroom, so this one will live in there.

Now wasn't that the easiest pillow cover EVAH?
Let me know if any of you whip these up yourself- I'd love to see pics.

As for the chevrons-
they're headed to the giveaway winner, all gussied up in some pretty wrapping...

I'll be back soon with a doozy of a kitchen update.
We are now sinkless,
and dishwasher-less.
Picture me rinsing out spaghettios in the tub...

I kid.

Have a wonderful Monday!

I've linked this post with:
Tutorials and Tips at Home Stories A 2 Z,
Weekend Wrap Up at Tatertots and Jello,

Monday, July 25, 2011

because sheets are fabric too...

Hello friends!
I've missed you!
Hope you had a fabulous weekend-
I took a break from blogging for a few days to
 play with my kiddos,
  see a movie,
  have a girls night out,
 prepare for a yard sale (more on that later),
and work on some pretty awesome projects-
one of which I'm going to share with you today.

***

I don't know about you, but I'm constantly inspired by things I find at the bullseye. (a.k.a. Target, a.k.a. Tar-jay)
While strolling the aisles last week, I came across this:

A toddler bedding set,
on clearance for the low low low price of just $7.48

That's right folks. For $7.48, Target was selling a toddler comforter, fitted sheet, flat sheet, and pillow case.


The sheets are what struck me as the cutest darn-tootin' things I'd seen in a while AND, seeing as how sheets are fabric and you need cute fabric to make dresses for cute little girls...

I knew I could turn those bed sheets into a couple of cute frocks
AND
do it all on a tee-tiny wee little budget.

Here's the deets:


Remember that dress I made for E for her Barbie party? I used the same faux pillow case dress pattern from the book pictured above,
BUT,
I did some altering and tweaking this time.
**I'll take you through the steps I took to make my girls' dresses, which are a wee bit different from the actual pattern instructions in the book. Since my girls are 14 months and 26 months, I had to make the dresses smaller than the pattern, which would work great for 3T/4T**

Here's a pic of what the finished product looks like in the book-

cute, huh?

1- Since I already had my fabric for the main part of the dress, the first thing I needed to do was to come up with a fabric that could work as the center panel for the dresses. In other words- find another fabric that will complement what you've already got. In this case, I knew I wanted the alphabet fabric (sheets) to be the main part of the dress (the pink with white polka-dots in the picture above), so I ended up going with the solid teal fabric in the bottom left corner of the photo below for the center panel.

p.s.- ALL of the fabric you see pictured above is fabric I already had on hand and purchased either on the cheap or as remnants. I pulled several options from my stash to see which would work best. The teal fabric I ended up using was purchased at Hancock for .99

2- Cut the center panel fabric first (in my case, the teal)
7" x 16 1/2 "

**You'll only need to cut one of these. There are 2 pictured above because I'm making 2 dresses at once- just didn't want to confuse anyone**

3- Now it's time to cut your 'main dress' fabric-
You'll need TWO 16 1/2" x 16 1/2" squares
I folded my sheet over 16 1/2" inches and cut 2 squares at the same time-


4- Take those 2 squares you just cut, put right sides together, and sew along either side. *It doesn't matter which side, right or left, because you end up with the same result either way.* Just make sure that if your fabric has a pattern (like ABC's) you line it up. Don't want half the ABC's right-side-up, and the other half upside-down. See how all of my ABC's are right-side-up in the photo below? That's what you'll have after sewing your 2 squares together.


5- Next, take your center panel, place it along one edge of one of the squares- right sides together- and sew.
Creating this:

center panel + 16 1/2" square + 16 1/2" square

6- Now bring the other square over, line it up with the open edge of the center panel- right sides together- and stitch, creating a tube.
Like this:

does that make sense?
this is the front of the dress.

7- Now take the middle of your center panel and line that up with the center seam in the back (the seam where the 2 squares are connected). You can either mark the center with a straight pin, or just line the 2 centers up together and use the seam in the back as your center. Bring over the seam from the center panel and the square on the right to the middle of the center panel and pin. **I know that was probably super-confusing, so take a look at the following pics**

pic from the book SHOWING what I just tried to explain

In the pic above, the seam on the right side of the center panel has already been pinned to the middle. The left seam is in my hand....

and now the left seam is pinned to the middle as well. Make more sense with the photos?
(I sure hope so...)
This step has actually just created the neckline of the dress.

8- Now to cut the armholes-
 The one and only pattern piece included in the book for this particular dress was this armhole piece,
BUT,
do not fret if you don't have the actual pattern piece to use. You can easily make a pattern piece using a piece of paper and there's really no way to mess this up.

Here's what the piece looks like:

You'll place it in the upper right and left corners of the dress and cut around it,
making this:

Now it's actually starting to resemble a dress,
am I right?

9- Now it's time to decide how long you want the dress. For my 14 month-old, I kept the length as is and just hemmed the dress.
**I ironed a 1/2" inch hem first and then stitched around the bottom of the dress**


**For my 26 month-old, I wanted to add a little length, so I cut two 2 1/2' x 16 1/2" strips to add along the bottom of her dress to make it longer. I also added 2 1/2" to the bottom of the teal panel in the center**

10- Next, you'll need to choose some bias tape OR ribbon to pin around the armholes.
The pattern calls for bias tape but I'm partial to ribbon since it works just as well and I always have it on hand. To make the ribbon a little easier to work with, I folded it in the middle and pressed it, creating a sort of 'bias tape ribbon', if you will...


Pin your bias tape (or ribbon) around each armhole,
like this:


11- Next, you'll need to cut two 3" x 12" strips out of either of the two fabrics you're working with to create the panels to slide the ribbon through. I went with the teal fabric for these dresses, but you could also use the patterned fabric you're using.

Place one of the strips along the top front of the dress and pin, folding over both edges as I've done in the photo below-

Keep in mind that the folds you created and pinned in step 7 are not stitched yet, so you'll have to pin the ribbon panel to the folds and sew through ALL of those layers that make up the front of the dress.

12- Take the other 3" x 12" strip and repeat this process on the back of the dress. (again, right sides together)

13- Fold over each 3" strip and stitch all the way down, creating a 'tube' to run the ribbon through. Do this to both the front and back,
like this:


14- Time to sew around the armholes!
**This is when I chose to change the color of the thread in my machine to a hot pink that would completely blend in with the ribbon I was using**


15- Pick out some lovely ribbon to run through those fabric 'tubes' you created at the top of the dress. (I used the same ribbon that I stitched around the armholes) The easiest way to go about this is to attach a safety pin to one end of the ribbon and then feed it through the fabric-


**This is another step where I veered from the pattern. In the picture from the book, the little girl has ribbons on BOTH shoulders, but I like to run one long piece of ribbon through BOTH tubes and tie it on ONE shoulder. Really, it's just whatever floats yer boat, ya know?

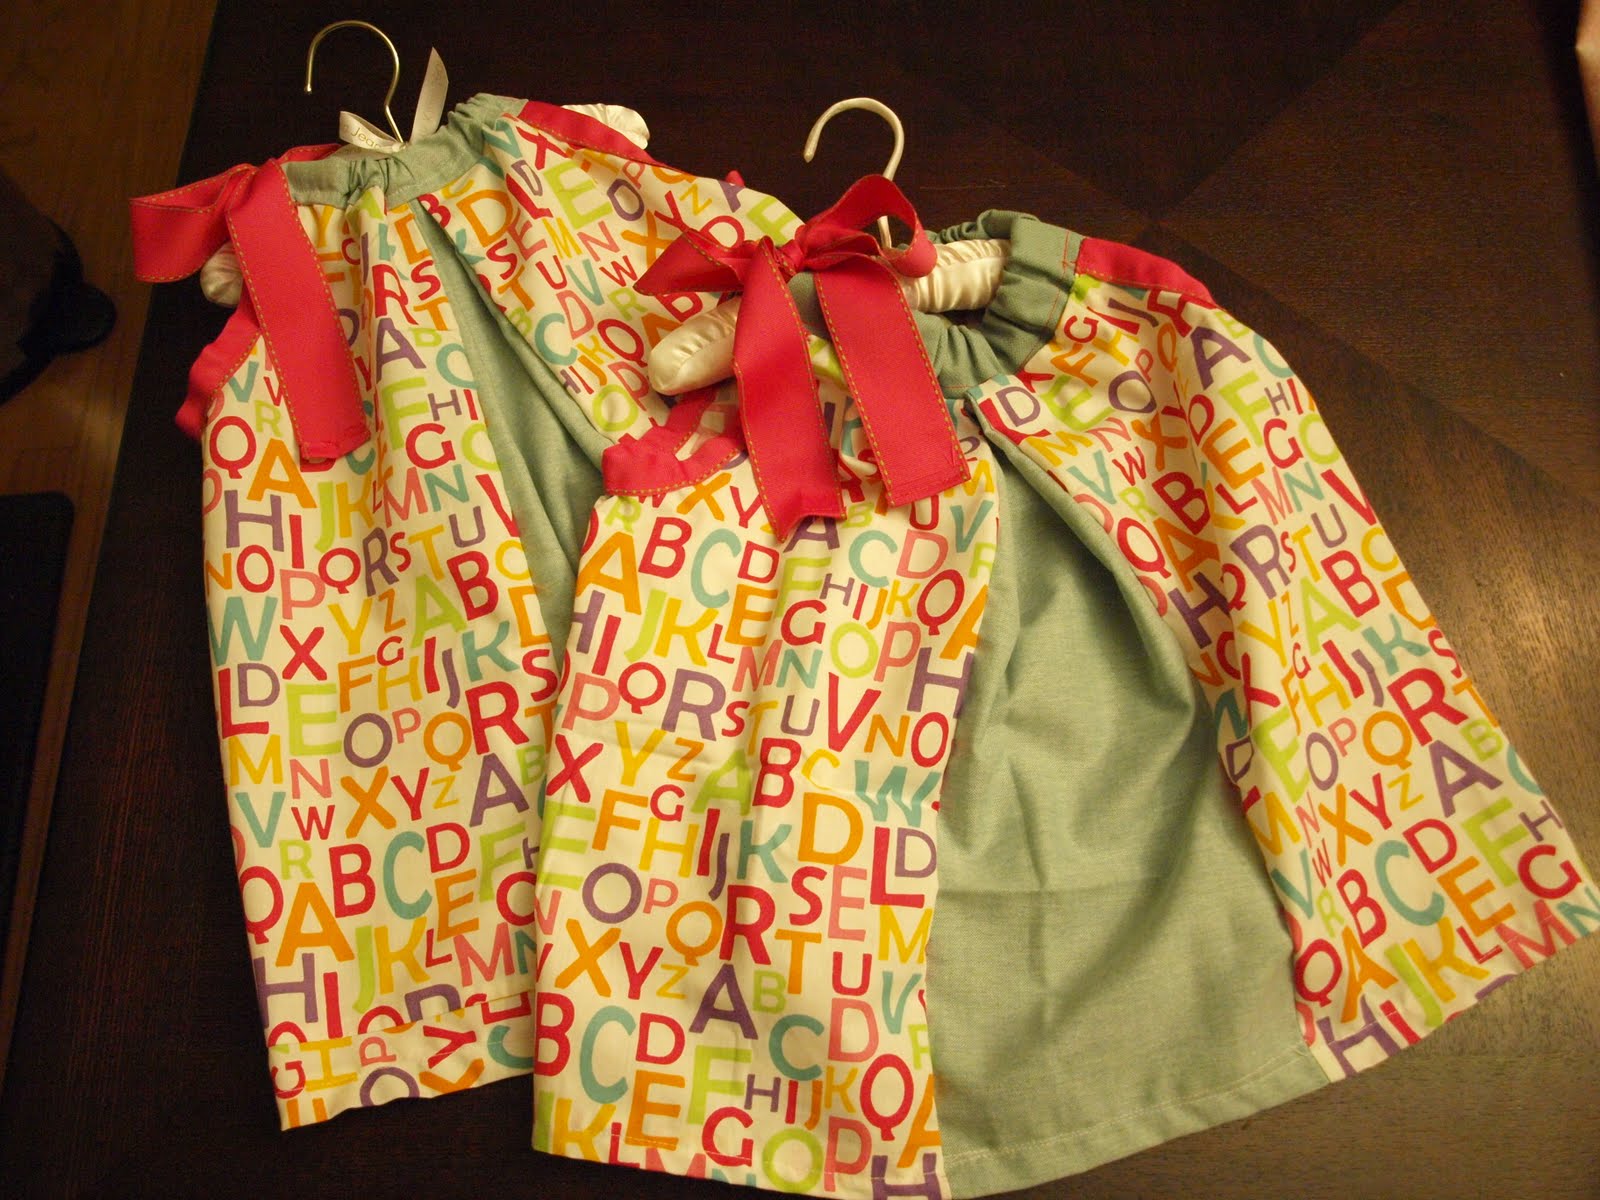
Here's my finished product:


How cute are these dresses?
Made from bed sheets!
Purchased on clearance at Target!

Here's my best attempts to get pictures of my girls actually wearing the dresses yesterday after church-

**I had some thick pink ric rac, so I added it about an inch from the bottom of each dress**


In the car headed to church...
LOVE that MM is resting her chin on her hand.
Also LOVE that E is sporting her Barbie sunglasses.

So there ya have it friends!
An easy-peazy dress pattern that's easily adaptable for several different sizes,
AND,
the great thing is they'll be able to wear them as tops when they're too short to wear as dresses. I'm planning to get several years worth of wear outta these frocks...

For 7.48, I ended up with
2 dresses,
1 comforter/quilt that my girls can use or play with,
1 fitted sheet that we can use now on either of our crib mattresses,
1 cute ABC pillow case,
and I still have a little over half of the flat sheet left, which means I can make that 7.48 stretch even further by making more cuteness from it.

So....
anyone scored a great deal lately that they want to share?
Or anyone else cut up some bed sheets lately?

Does this post remind anyone else of Scarlett O'Hara or Maria Von Trapp
(even though they used curtains instead of sheets)
or is it just me?

(grin)

I've linked this to:
Metamorphosis Monday at Between Naps on the Porch,
Craftomaniac Monday at Craftomaniac,
Mad Skills Party at Mad in Crafts,
Amaze Me Monday at Dittle Dattle,
Creative Me Monday at The Southern Institute,
Market Yourself Monday at Sumo's Sweet Stuff,
Just Something I Whipped Up at The Girl Creative,
Made by You Monday at Skip to My Lou,
Pink Hippo Party at Pinkapotamus,
Get Your Craft On at Today's Creative Blog,
Tutorials and Tips Tuesday at Home Stories A 2 Z,
Tip Junkie handmade projects
Take a Look Tuesday at Sugar Bee Crafts,
Handmade Tuesday at Ladybug Blessings,
Show Me What Ya Got at Not Just a Housewife,
Tutorial Tuesday at Hope Studios,
Anything Goes at Type A Decorating,
Visit thecsiproject.com


Show and Tell at Blue Cricket Design,
Whatever Goes Wednesday at Someday Crafts,
Transformation Thursday at The Shabby Creek Cottage,
Weekend Wrap up at Tatertots and Jello,
Sundae Scoop at I Heart Naptime,
A Round Tuit at Creating My Way to Success,
Before and After Party at Thrifty Decor Chick,

Related Posts Plugin for WordPress, Blogger...