Friday, November 26, 2010

Christmas crafts- Day 5

Better late than never, right?
Today's craft comes to us from the blog Sutton Grace. She has awesomely creative ideas and when I saw her Christmas pillows a few days ago, I knew I had to try them. And by the by, I haven't completed mine yet. (gasp) That's right, I don't have finished pics of mine yet because it's not, ummm, .....finished. I liked the top red/white one the best and already had all the fabric I needed on hand from, you guessed it, the remnant section at the hob lob. Hopefully, after I get some much needed sleep, I'll have some pics to post.

Speaking of sleep, did any of you give it up to go stand in lines at your fave stores? Or did you opt out for some shut-eye and do your black Friday shopping online? I actually did a bit of both, sort of. My sis and I headed out oh so early this morning to the lovely red bullseye (Target), but, ummm....we didn't do much shopping. Long, silly story. Wait, not long. Just silly. I made it back to the Tar-jay 7 hours later, after a bit more sleep, and actually finished up our kiddos Christmas gifts. Yep. D-O-N-E. As for everyone else....still working on those.

Didn't get any decor out today, but my baby is decked out. That counts for something, right?

Those pjs say "Baby's First Christmas", and they were E's last year, so...they're MM's this year. So nice of the girls to share like that.
Happy Black Friday, ya'll.

Thursday, November 25, 2010

Week of Christmas crafts: Day 4 & Happy Thanksgiving!

First off- HAPPY THANKSGIVING if you're actually reading this on Thursday. I wrote this post on Wednesday, so I hope you're having a great day celebrating with friends/family and eating a whole lot of yummy goodness. (I know I will be)

Today's craft is something I've already talked about here on the ole' blog....
burlap Christmas stockings!

That's right...I've looked at hundreds, nay, even thousands (ok, maybe not) of different burlap stockings out there in the world wide web (mostly on etsy) and here's a couple of my favorites.

First up is this lovely with the ruffles. Oh those ruffles, how I love them. Also...diggin the fact that it's photographed in front of a pile of chopped up wood. Not quite sure why...
I've posted this pic before, and I think this one made the cut with me because of the monogram. Lovin that big ole' lower case g.
Now...onto how I made these, and oh by the way did I mention that I don't really sew? Hmmm? Because, by the by, I don't. Not really. The little bit of knowledge I have on the subject came from my mom, grandmother, friend and costumer, and costume construction professor in college. (theatre major) So... I'd like to thank Phyllis, Mattie, Judy, and John Franklin for teaching me how to thread and work a sewing machine.
First, you'll need burlap. duh. I picked mine up at the hob lob last week and guess where I found it? That's right- in with the remnants.

One of the remnants was 1.49...

And the other was 2.09. So, all together that's, .....hang on, I can do this......hang on............3.58. Yep. I spent a total of 3 dollas and 58 cent-a-roonies on my burlap. Score.

The other materials are ever whatcha want- you could use ribbon on the fronts, felt, maybe you want a monogram painted on, maybe you want jingle bells or pompoms.....skies the limit folks. Just go to etsy and type burlap stocking for more inspiration. (better yet, just click that link. but don't stay there forever. etsy can be addicting. not that I'd know.....I've just heard)

Anywho.... first I had to make my pattern. Since a stocking is a fairly simple shape, I figured I could just free-hand it. I got some packaging paper (I always have this on hand. Not quite sure why, but it sure came in handy today, didn't it?) and a pencil...

(you could always just draw a pattern onto newspaper or wrapping paper)

and went to a-sketchin. I drew one, wasn't crazy about it, so I drew another. And then another, until I felt I had one that I liked. It was kind of a hot mess:


but I cut out the one that I liked best, so there's my pattern:

Now, it's time to cut it out. I laid my burlap out onto my table, and it looked like this:

hideous. just plain hideous.
So....I knew I'd have to iron it. My first step there was to a)find the iron, and b) figure out how to turn it on. Before you think bad thoughts of me for not ironing, let me just say in my defense that we also have a steamer and I heart it. Big time. It's quick, it's always out, ready to go. All you have to do to turn it on is step on the button. That's right. Easy-peasy-lemon-squeazy. So that's why me and the iron aren't BFF's. The hubs likes to iron. I like to steam. Moving on...
I located said iron, turned it to the "will get wrinkles out of sheet metal" setting (or maybe it just said 'MAX'), and went to ironing. I knew since burlap is the Dwayne Johnson of fabrics, I probably needed that baby up as high as it would go to get those gnarly wrinkles out. And look...

It worked.
I pinned my cute little pattern to the burlap, which was folded so I'd be cutting two at one time, and cut it out about 1/4 of an inch larger than my pattern. You know, for the seam allowance and whatnot. (someone that sews, please let me know if I used the correct terminology. It will make me feel ever so smart if I did)
So it looked like this:

And this:
( I just love that turned up elf-ish toe)

As if I haven't already digressed enough from the stocking, please allow me just another moment to mention what just happened to arrive in the mail while I was in the cutting-out stages.(thanks to the hubs for fetchin it for me from the mailbox)
This little beauty-
Isn't she pretty? Since I've been making quite a bit of stuff lately, and had straight pins out and about on my work surfaces, and since I live with littles that would pick those straight pins up if their little fingers could get to them, I decided I needed a pin cushion. You'll never guess where I found this....
etsy
Here's the link to the fabulous shop she came from. And yes, this little birdie is a girl. I can just tell.

I immediately put her to work. She does a fabulous job- and not only does she fulfill the purpose for which she was intended (holding pins), but she also falls into the category of cute little white animal figure which I've been a little crazy about as of late. But, I digress....


Back to the stockings. I cut them all out-

And set them aside.
Next, I went to my remnant fabric stash and pulled out this white cottony fabric. (I know I'm nowhere near it's actual name- I have no clue what it is. It's just pretty and white and it's some kind of fabric) I cut it into strips about 2 and 1/2 inches wide. I did NOT measure. I just eyeballed it. I also did not iron it. I'd already ironed the burlap. Wore me out.

Now, for the ruffles. I'd seen some cute ruffles on some bags and clutches I'd seen online that looked pretty easy to replicate,and remember- I'm no seamstress. If I was going to do it myself, it had to be simple. I grabbed my cute little birdie and started pinning some pleats.

I didn't really want them to be straight, more haphazard, if you will.

Like this.
So I did a straight stitch down the middle, and...

Voila.
And then I wanted another, so I pinned...
And stitched, and then I had two lovely ruffles.
Next I turned down the tops of each side of the stocking and sewed all the way across, and then put the 'right sides' facing each other-

pinned them together, and sewed all the way around my stocking. Again, I'm sure I'm not using all the correct terminology, but maybe the pics will explain it better than I. (or is it better than me? Too tired to worry about it just now)
And there ya have it-
My pretty elf-ish/burlap/ruffled stockings
Here's 'without flash'
and here's 'with flash'
(no idea why I put two on here)
And a closer look at those rufflies again-

Yes, I was a bit lazy and didn't sew ruffles onto the back as well. My thinking was that no one would be seeing the backs of them as they hang on my mantle. Speaking of mantle, I'll need to add a ribbon or somesuch that it can hang by. Hmmm....forgot that part. Ah well...that will be easy enough. I'll also probably add our initials to them since I think that'd be cool and the hubs did use the word 'awesome' when I asked (told) him about it. I'll post pics once they're completely finished and my house is all 'done up' in it's Christmas garb.
And I'll bet you never knew it, but guess who was hanging out with me while I made these?

This lil cutie. She was all about the stockings. And she wants initials on them too. Two 'M's though, not M cubed. I'll oblige.

Happy Thanksgiving once again! Hope your day is blessed and your belly is full!
P.S. I'm linking this project up over at the idea room. Check out all of the other great ideas there!


Wednesday, November 24, 2010

Week of Christmas crafts: Day 3

Today's craft is a December Daily album. Now....before any of you say, "yuck....scrapbooking", let me tell you how incredibly simple this project can be. It can be as elaborate or as easy-peasy as you want it to be. This idea comes from Ali Edwards, creative extraordinaire, and it's all documented on her blog. Quite simply, a December Daily album is somewhere to record/keep everything that you or your family do in the month of December to celebrate Christmas. All the parties, traditions, family get-togethers, shopping, list making, tree trimming, singing, and all out merriment produce lots of pictures, cards, invitations, letters to Santa, etc. and this is a place for you to house all of that 'stuff''.

Here's a couple of pics from some cover designs by Ali: And some of her interior pages.

And here's what I used to make the concept my own, while simplifying the whole "putting the album together" process. I'm using ready made stuff, so basically all I had to do was punch a few numbers out and stick my pages in a little handy dandy binder.

Pictured above are some Christmas embellishments from my scrapbook stash, a tiny stapler, some scissors, the binder and pages/pockets I'm using for my album (purchased at Target), and some FREE December daily printables I found online. That's right folks. F-R-E-E.

Here's a closer look at the album and pages. It's an 8 x 6 album called KIT. (Keeping It Together) Clever, isn't it? Anyways...I bought an album (they come in several colors/patterns), pocket pages, regular pages with subject/date at the top, and some business card pages which I'm planning to use for pics that I print in wallet size. And again... it all came from Tar-jay.

Here's a closer look at some of thoses free printables. The one on top I found on Ormolou's site. Here's the link: Ormolou free December Daily printables


If clicking on the image doesn't automatically make it larger and give you the option to print, save image as a 'target', not a picture, and try that. It worked one way on my laptop and another on my desktop. Go figure.


The next free printable I found came from Creativityprompt.com

Here's a closer look at those:

I used a circle punch to cut out the numbers (you could, of course, cut them by hand) and am using them on each of my pages.

Here's a pic of a cute mitten clip I found. It's random and just really cute. Had to share. Moving along...
Here's my title page. See? Super simple-

the foundation is craft paper, again- from my stash. My goal was to really use stuff I already had on hand. Basically the only thing purchased for this was the album and pages. I actually could have used cardstock or copy paper cut down to 6 x 8 pages to have stayed even more on the cheap, but ah well....

The only things added to title page were a giant M sticker (for Mathews) from my stash,

a tiny little clear star which I stapled on,

and the December Daily ticket from one of my free printables.

Did I mention those babies were free?

After my title page, I added an envelope from one of those Christmas embellishment kits I already had. I'm going to keep Oliver's list of things he's wishing for this year because, not only will it be cool to keep forever and ever, but will also be a sample of his handwriting from this year.

Here's day one, with the date circle attached at the top with a mini staple. simple simple

I'm going to sporadically include patterned Christmas paper throughout, because it's pretty and I have tons of it in my stash.


Next page has a date circle and a Holly Jolly Christmas from, again, a free printable.

Next is one of the pocket pages and my 25th day page. The vintage santa image is from my stash and the other is from one of the printables. It was free, by the way.

I attached the date circles to 25 pages in my book, but the other elements will be placed inside as their needed. For example, I know I'll take pics of O's Christmas program at church, so I'll probably add extra picture pages/pockets on that date. Another great thing about this project is you can add to or take away anything that you need and make changes as you go. You could use a traditional scrapbook for this in any size, a 3-ring binder, you could even use planner pages. Ever whatcha want. After reading about a December Daily on Ali's blog a few years ago, I've made plans to make one each year but have never followed through. Now that it's done and literally took me about 30 minutes to put together, I have NO excuses. I'm looking forward to not only recording my family's memories this year, but having this album to look at years down the road as well. And remember, you can journal about each day as little or as much as you'd like. I didn't even talk about that part- journaling is SO important (I think) but can be as little as, "decorating the Christmas tree", next to a picture of your family doing just that, OR you can go on for pages about your decorating process, what your favorite decorations are, etc. Completely up to you. Here's the link to Ali's blog again so that you can check out all of her posts on the subject. There are LOTS.


Now, this next section is just for my kiddos grandmas. Since I know they only read this blog for pics or stories about their grandchildren, here ya go Ma'am and MawMaw...

Sweet MM in her pack n play. What ever would we do without pack n play's?


E and O last night. Not quite sure what O was doing here.

Potatohead creation last night.

And E at breakfast this morning. I moved our table and one of the chairs from the living room into the foyer so there would be less distractions and she ate her entire breakfast here. So cute. I love that her feet are so far from the floor.


Tuesday, November 23, 2010

Week of Christmas crafts: Day 2

Today's craft is a bit of a re-visit. Meet the "yarn wreath" that seems to be taking the decor world by storm. This particular inspiration wreath was found on etsy from the store ItzFitz. It costs a whopping 40 buckaroos. Now, it's pretty. So pretty, in fact, that I'm using it as my inspiration piece, but...I'd nevereverever in a zillion years pay 40 buckaroos for it. Nope. Before we get to the details of my take on this wreath, I thought I'd post some pics of some other wreaths I've made...

This one graces our front door. I love it. It makes me smile each time I drive by and see it looking back at me from the house. The base is a twig wreath from hob lob purchased at 50% off, which made it about $2.50, and the letter is also from hob lob, purchased at 50% off for $5. I just attached the letter with fishing line and voila. Done.


Next is a wreath that I have really really really gotten my money's worth from. Again, I took a twig wreath and wrapped ribbon and tulle around it. Then made a cute little paper bunting and attached with fishing line, and bought a thin wooden letter from the hob lob for about a buck. I painted the letter and wrapped fishing line around it to attach to the wreath, and that's it folks. At this particular moment, it's wearing an "L" for a baby shower that I had at my house a couple of months ago. The baby's name is Lucy, and she's precious by the way...

The wreath has also worn an "M" cubed when it hung on my hospital door after the birth of my youngest daughter, Mary Martin Mathews. (hence....the M, cubed)

It's also worn an "E" (for Eliza) on the front door of our house during my oldest daughter's first birthday.

This wreath's been busy....


And...we can't forget my latest wreath creation (not counting the one in this post, of course). If you missed the post about this baby, you can find it here.

Don't you like how I got myself in the pic?

Now- onto the supply list. You'll need a wreath. (duh) Since I couldnt find a larger foam wreath form like the one I picked up from the dollar tree, I decided to go with a straw one instead. This particular one came from the hob lob and was a whole 2 bucks. (half-off of 3.99) Next, you'll need some fabric/ribbon/felt for the rosettes, and of course, whatever color yarn you'd like. I went with a thicker yarn this time since I was using a bigger wreath and knew I'd be wrapping yarn around that sucker twice as much as that smaller fall-ish one. And last, but good gravy not least, you'll need a handy dandy glue gun.

Attention: if you plan on using a straw wreath like I did, you will want to start this project outside. Don't even think about unwrapping that bad boy inside your house. I mean it. If it's freezing cold where you live and crafting outside is not an option, then this project is not for you. After removing only a 2-inch section of the plastic wrapping in my living room, it looked like I'd massacred the Scarecrow from the Wizard of Oz.
Now, since that's out of the way, let's get started.
Take your yarn and begin wrapping. Wrap a few times over your loose end to secure it.

And then, just keep on a'wrappin.

It helps if you have a little boy ride circles around you on his big wheel...

Half way! Wa-hoooooo!

Get this close to finishing and run out of yarn.

Make this face because you almost bought 2 things of yarn instead of 1, but put the second one back before checking out because you were sure you just needed the one.

Drive back to Wal-mart the following day after school only to realize they're out of the color you need. Wait til that night, load all 3 of your kiddos into the car, drive across town to the other Wal-mart, unload all 3 kiddos, find the right color yarn, hand it to the lady in the fabric department because your baby is screaming because she's hungry and you can't take merchandise into the bathroom with you, realize there's no hot water in any of the bathrooms at Wal-mart so you can't make a bottle, get your yarn from fabric department lady and proceed quickly to the check-out because your baby is still crying (screaming). Check out holding your baby in one hand while you pay with the other because that's the only way she'd stop screaming. Load all 3 kiddos back into the car and drive home. Whew.
Finish wrapping wreath and secure other loose end with hot glue.
Onto rosettes. It's time to decide what colors you want your embellishments to be. I'm sticking with the colors from my ribbon trees, in fact, even using my leftover ribbon, and some other green fabric I bought as a remnant for 99 cents. If you're using fabric, cut it into long strips about 2 inches wide. Like this:

(I'd like to thank little old rocking chair for modeling my fabric strips)

Next, cut your felt into circles about 3-3.5 inches in diameter. These circles will be the base for your rosettes.
For my first rosette, I used the pink ribbon from yesterday's tree and added a bit of pink tulle. This of course is optional.

Take your ribbon (or fabric) and turn down the end, like this:

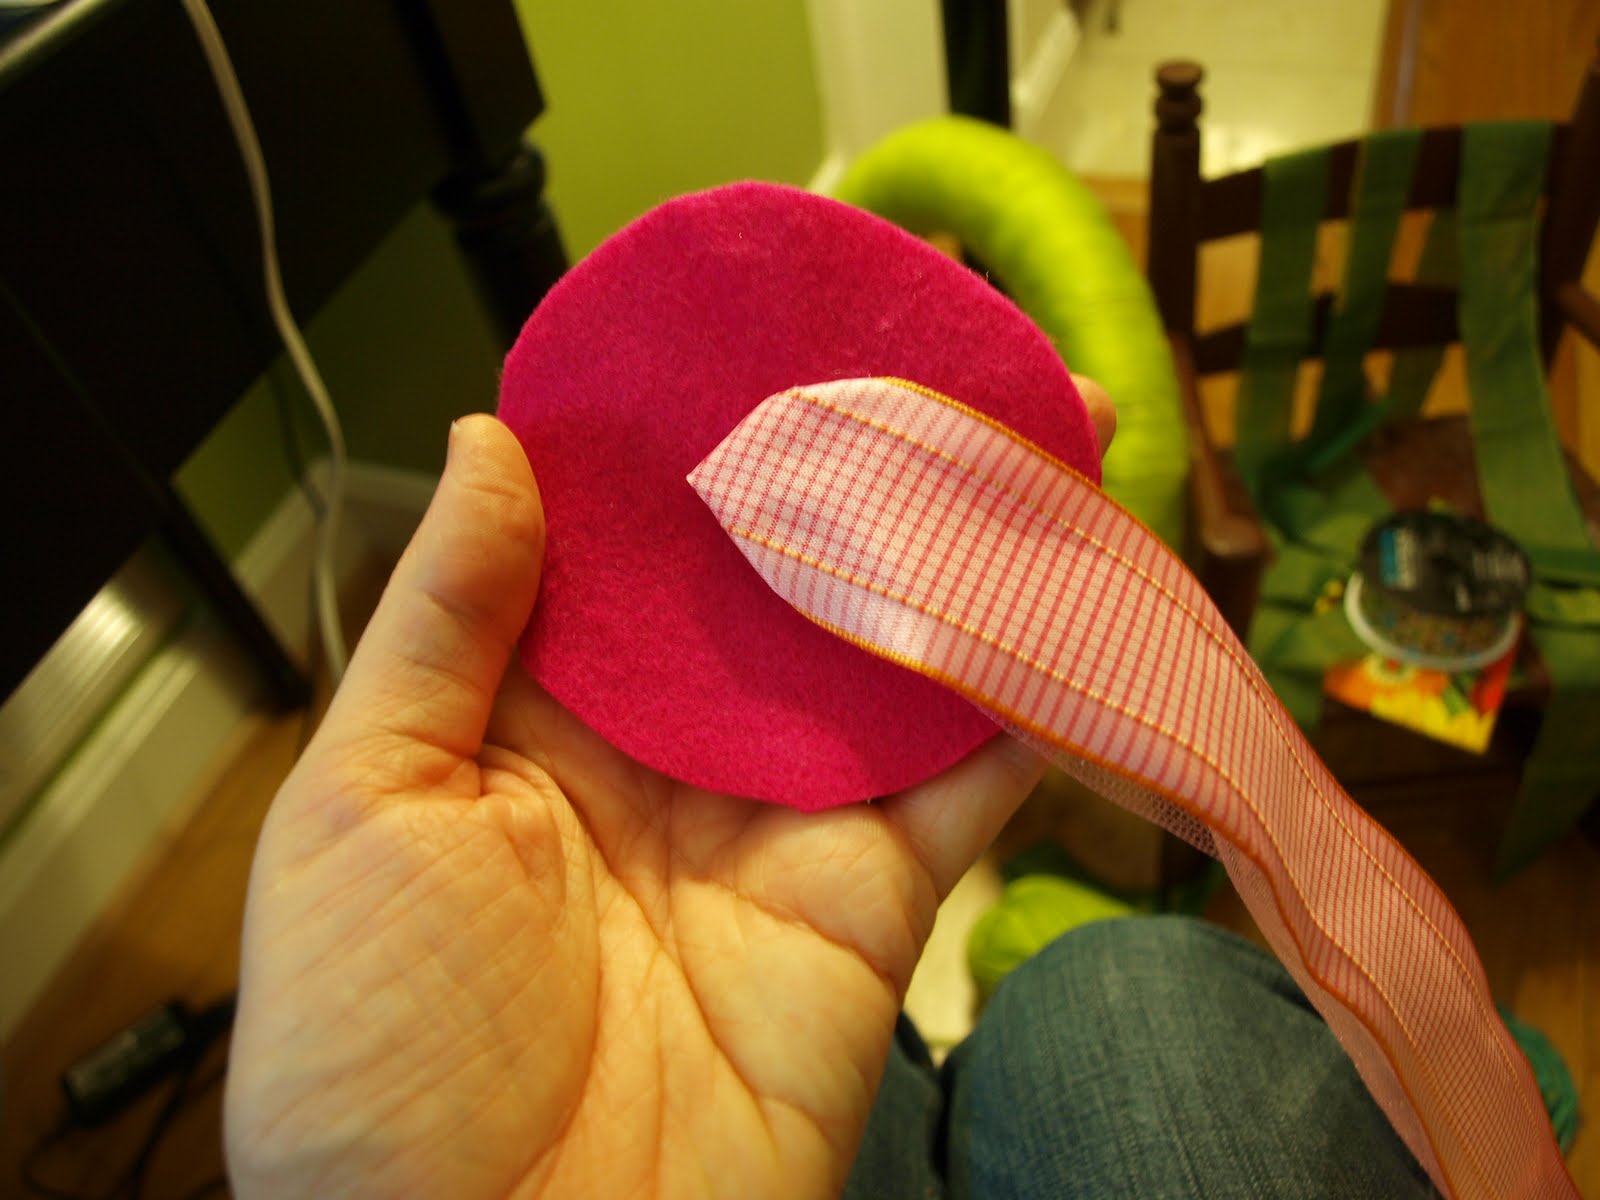
Place a dot of glue onto the center of one of the felt circles and attach the end of your ribbon, like this:

Now twist the ribbon and attach with a little bit of glue.

Keep twisting and glueing....


Until you have something like this:

Just cut off the long end and attach to the back of the rosette, like this:

And voila. Done. Easy-peezy, right?

I made this pink one, and one from the green/turquoise ribbon from my other tree.
If you're using fabric, the instructions are the same:
Glue, twist, glue, twist....come on, say it with me- GLUE, TWIST, GLUE, TWIST....

(fun, isn't it?)

I wanted my fabric rosettes to be a little smaller, so I stopped when I got here:
Just cut off the excess felt....

And you've got a beautiful, slightly smaller, rosette.

I love how the ends of this one look like little leaves. Just had to share.

Moving along. Now you have your wreath and your rosettes. I made 5 for mine, but you can certainly have as many or as few as you'd like.

Hot glue those babies down as soon as you've decided how you want them arranged on your wreath, and....
VOILA.

Doesn't it look pretty with my trees? Hmmmm???


And that's all she wrote, folks. Done. If you're stumped on what you'd like your wreath to look, just go to etsy and type 'yarn wreath'. There's a bajillion options that might inspire you. Also, did anyone happen to count how many times I typed the word 'wreath' in this post. I think it was also a bajillion.

I'm linking this post over at Today's Creative Blog. Check out the other entries!

Until tomorrow.......

Related Posts Plugin for WordPress, Blogger...