
Hello friends!
I've missed you!
Hope you had a fabulous weekend-
I took a break from blogging for a few days to
play with my kiddos,
see a movie,
have a girls night out,
prepare for a yard sale (more on that later),
and work on some pretty awesome projects-
one of which I'm going to share with you today.
***
I don't know about you, but I'm constantly inspired by things I find at the bullseye. (a.k.a. Target, a.k.a. Tar-jay)
While strolling the aisles last week, I came across this:

A toddler bedding set,
on clearance for the low low low price of just $7.48
That's right folks. For $7.48, Target was selling a toddler comforter, fitted sheet, flat sheet, and pillow case.

The sheets are what struck me as the cutest darn-tootin' things I'd seen in a while AND, seeing as how sheets are fabric and you need cute fabric to make dresses for cute little girls...
I knew I could turn those bed sheets into a couple of cute frocks
AND
do it all on a tee-tiny wee little budget.
Here's the deets:

Remember that dress I made for E for her Barbie party? I used the same faux pillow case dress pattern from the book pictured above,
BUT,
I did some altering and tweaking this time.
**I'll take you through the steps I took to make my girls' dresses, which are a wee bit different from the actual pattern instructions in the book. Since my girls are 14 months and 26 months, I had to make the dresses smaller than the pattern, which would work great for 3T/4T**
Here's a pic of what the finished product looks like in the book-

cute, huh?
1- Since I already had my fabric for the main part of the dress, the first thing I needed to do was to come up with a fabric that could work as the center panel for the dresses. In other words- find another fabric that will complement what you've already got. In this case, I knew I wanted the alphabet fabric (sheets) to be the main part of the dress (the pink with white polka-dots in the picture above), so I ended up going with the solid teal fabric in the bottom left corner of the photo below for the center panel.

p.s.- ALL of the fabric you see pictured above is fabric I already had on hand and purchased either on the cheap or as remnants. I pulled several options from my stash to see which would work best. The teal fabric I ended up using was purchased at Hancock for .99
2- Cut the center panel fabric first (in my case, the teal)
7" x 16 1/2 "

**You'll only need to cut one of these. There are 2 pictured above because I'm making 2 dresses at once- just didn't want to confuse anyone**
3- Now it's time to cut your 'main dress' fabric-
You'll need TWO 16 1/2" x 16 1/2" squares
I folded my sheet over 16 1/2" inches and cut 2 squares at the same time-

4- Take those 2 squares you just cut, put right sides together, and sew along either side. *It doesn't matter which side, right or left, because you end up with the same result either way.* Just make sure that if your fabric has a pattern (like ABC's) you line it up. Don't want half the ABC's right-side-up, and the other half upside-down. See how all of my ABC's are right-side-up in the photo below? That's what you'll have after sewing your 2 squares together.

5- Next, take your center panel, place it along one edge of one of the squares- right sides together- and sew.
Creating this:

center panel + 16 1/2" square + 16 1/2" square
6- Now bring the other square over, line it up with the open edge of the center panel- right sides together- and stitch, creating a tube.
Like this:

does that make sense?
this is the front of the dress.
7- Now take the middle of your center panel and line that up with the center seam in the back (the seam where the 2 squares are connected). You can either mark the center with a straight pin, or just line the 2 centers up together and use the seam in the back as your center. Bring over the seam from the center panel and the square on the right to the middle of the center panel and pin. **I know that was probably super-confusing, so take a look at the following pics**

pic from the book SHOWING what I just tried to explain

In the pic above, the seam on the right side of the center panel has already been pinned to the middle. The left seam is in my hand....

and now the left seam is pinned to the middle as well. Make more sense with the photos?
(I sure hope so...)
This step has actually just created the neckline of the dress.
8- Now to cut the armholes-
The one and only pattern piece included in the book for this particular dress was this armhole piece,
BUT,
do not fret if you don't have the actual pattern piece to use. You can easily make a pattern piece using a piece of paper and there's really no way to mess this up.
Here's what the piece looks like:

You'll place it in the upper right and left corners of the dress and cut around it,
making this:

Now it's actually starting to resemble a dress,
am I right?
9- Now it's time to decide how long you want the dress. For my 14 month-old, I kept the length as is and just hemmed the dress.
**I ironed a 1/2" inch hem first and then stitched around the bottom of the dress**

**For my 26 month-old, I wanted to add a little length, so I cut two 2 1/2' x 16 1/2" strips to add along the bottom of her dress to make it longer. I also added 2 1/2" to the bottom of the teal panel in the center**
10- Next, you'll need to choose some bias tape OR ribbon to pin around the armholes.
The pattern calls for bias tape but I'm partial to ribbon since it works just as well and I always have it on hand. To make the ribbon a little easier to work with, I folded it in the middle and pressed it, creating a sort of 'bias tape ribbon', if you will...

Pin your bias tape (or ribbon) around each armhole,
like this:

11- Next, you'll need to cut two 3" x 12" strips out of either of the two fabrics you're working with to create the panels to slide the ribbon through. I went with the teal fabric for these dresses, but you could also use the patterned fabric you're using.
Place one of the strips along the top front of the dress and pin, folding over both edges as I've done in the photo below-

Keep in mind that the folds you created and pinned in step 7 are not stitched yet, so you'll have to pin the ribbon panel to the folds and sew through ALL of those layers that make up the front of the dress.
12- Take the other 3" x 12" strip and repeat this process on the back of the dress. (again, right sides together)
13- Fold over each 3" strip and stitch all the way down, creating a 'tube' to run the ribbon through. Do this to both the front and back,
like this:


14- Time to sew around the armholes!
**This is when I chose to change the color of the thread in my machine to a hot pink that would completely blend in with the ribbon I was using**

15- Pick out some lovely ribbon to run through those fabric 'tubes' you created at the top of the dress. (I used the same ribbon that I stitched around the armholes) The easiest way to go about this is to attach a safety pin to one end of the ribbon and then feed it through the fabric-

**This is another step where I veered from the pattern. In the picture from the book, the little girl has ribbons on BOTH shoulders, but I like to run one long piece of ribbon through BOTH tubes and tie it on ONE shoulder. Really, it's just whatever floats yer boat, ya know?
Here's my finished product:

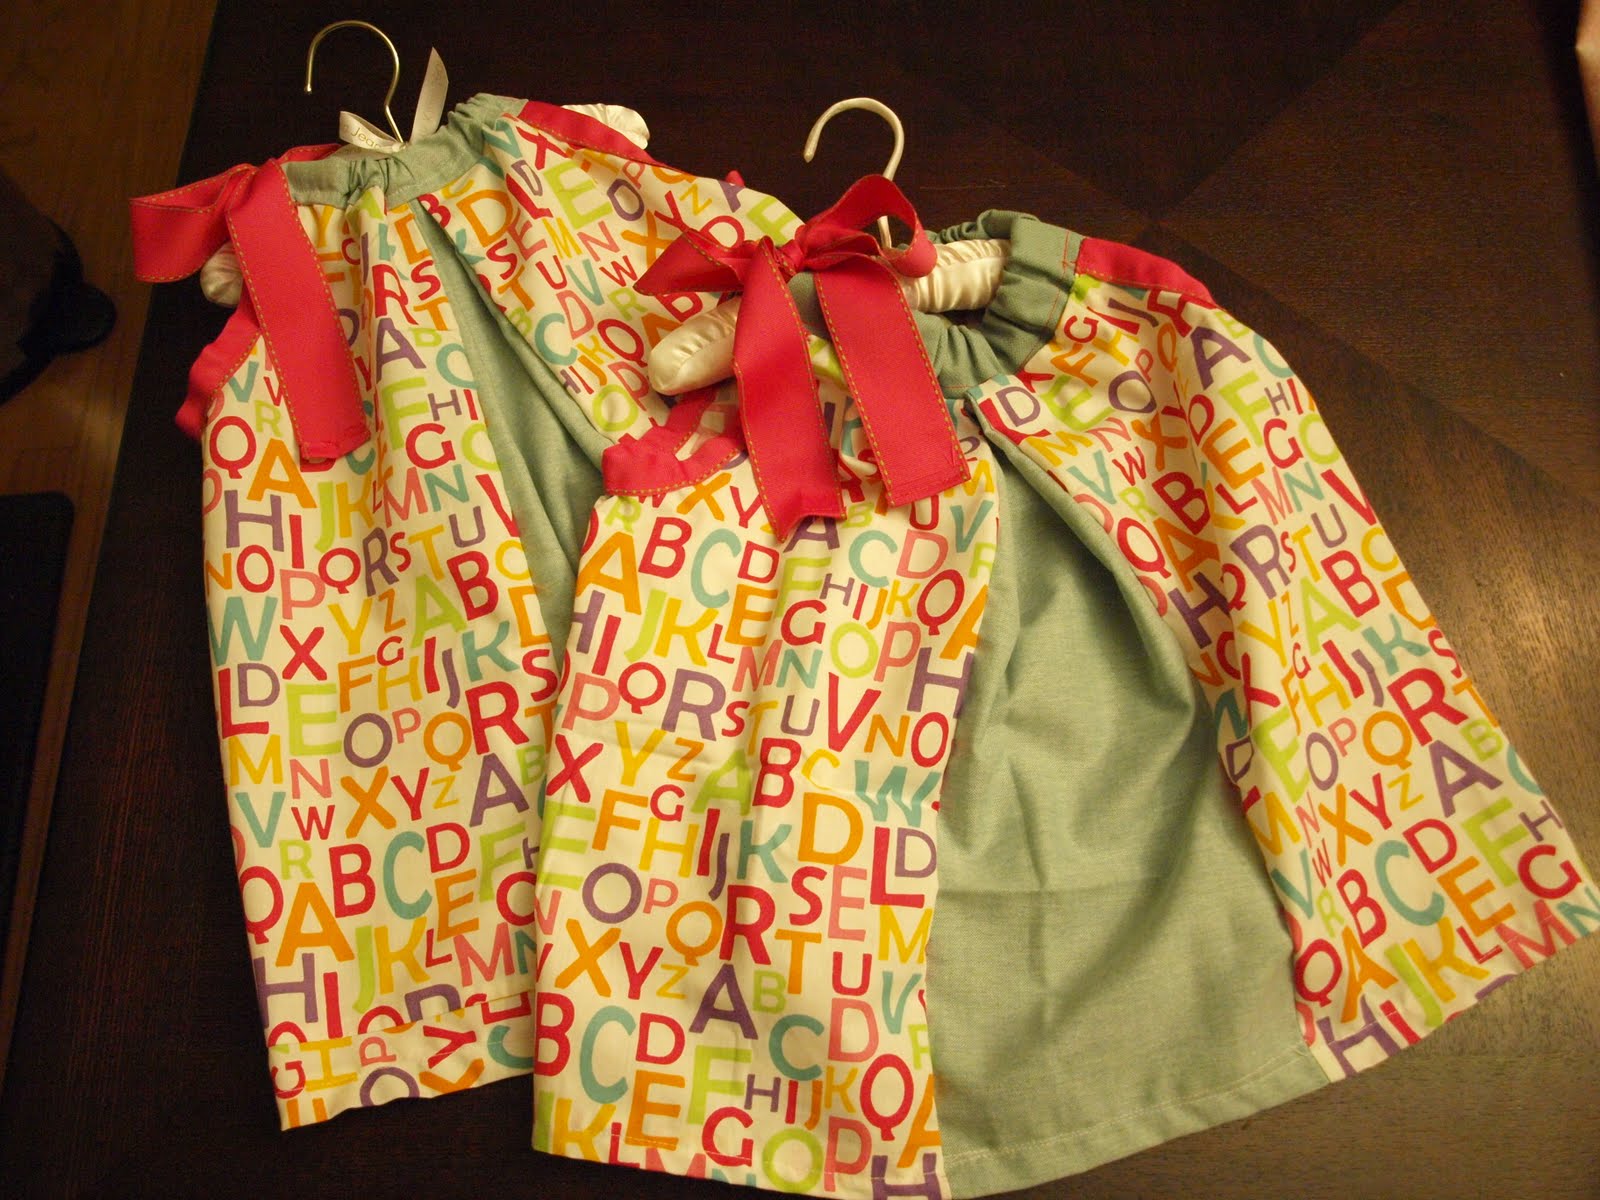
How cute are these dresses?
Made from bed sheets!
Purchased on clearance at Target!
Here's my best attempts to get pictures of my girls actually wearing the dresses yesterday after church-

**I had some thick pink ric rac, so I added it about an inch from the bottom of each dress**


In the car headed to church...
LOVE that MM is resting her chin on her hand.
Also LOVE that E is sporting her Barbie sunglasses.
So there ya have it friends!
An easy-peazy dress pattern that's easily adaptable for several different sizes,
AND,
the great thing is they'll be able to wear them as tops when they're too short to wear as dresses. I'm planning to get several years worth of wear outta these frocks...
For 7.48, I ended up with
2 dresses,
1 comforter/quilt that my girls can use or play with,
1 fitted sheet that we can use now on either of our crib mattresses,
1 cute ABC pillow case,
and I still have a little over half of the flat sheet left, which means I can make that 7.48 stretch even further by making more cuteness from it.
So....
anyone scored a great deal lately that they want to share?
Or anyone else cut up some bed sheets lately?
Does this post remind anyone else of Scarlett O'Hara or Maria Von Trapp
(even though they used curtains instead of sheets)
or is it just me?
(grin)
I've linked this to:
Metamorphosis Monday at Between Naps on the Porch,
Craftomaniac Monday at Craftomaniac,
Mad Skills Party at Mad in Crafts,
Amaze Me Monday at Dittle Dattle,
Creative Me Monday at The Southern Institute,
Market Yourself Monday at Sumo's Sweet Stuff,
Just Something I Whipped Up at The Girl Creative,
Made by You Monday at Skip to My Lou,
Pink Hippo Party at Pinkapotamus,
Get Your Craft On at Today's Creative Blog,
Tutorials and Tips Tuesday at Home Stories A 2 Z,

Take a Look Tuesday at Sugar Bee Crafts,
Handmade Tuesday at Ladybug Blessings,
Show Me What Ya Got at Not Just a Housewife,
Tutorial Tuesday at Hope Studios,
Anything Goes at Type A Decorating,


