
 Before we get to the details of my take on this wreath, I thought I'd post some pics of some other wreaths I've made...
This one graces our front door. I love it. It makes me smile each time I drive by and see it looking back at me from the house. The base is a twig wreath from hob lob purchased at 50% off, which made it about $2.50, and the letter is also from hob lob, purchased at 50% off for $5. I just attached the letter with fishing line and voila. Done.
 Next is a wreath that I have really really really gotten my money's worth from. Again, I took a twig wreath and wrapped ribbon and tulle around it. Then made a cute little paper bunting and attached with fishing line, and bought a thin wooden letter from the hob lob for about a buck. I painted the letter and wrapped fishing line around it to attach to the wreath, and that's it folks. At this particular moment, it's wearing an "L" for a baby shower that I had at my house a couple of months ago. The baby's name is Lucy, and she's precious by the way...
The wreath has also worn an "M" cubed when it hung on my hospital door after the birth of my youngest daughter, Mary Martin Mathews. (hence....the M, cubed)
It's also worn an "E" (for Eliza) on the front door of our house during my oldest daughter's first birthday.
This wreath's been busy....
 And...we can't forget my latest wreath creation (not counting the one in this post, of course). If you missed the post about this baby, you can find it here.
Don't you like how I got myself in the pic?
 Now- onto the supply list. You'll need a wreath. (duh) Since I couldnt find a larger foam wreath form like the one I picked up from the dollar tree, I decided to go with a straw one instead. This particular one came from the hob lob and was a whole 2 bucks. (half-off of 3.99) Next, you'll need some fabric/ribbon/felt for the rosettes, and of course, whatever color yarn you'd like. I went with a thicker yarn this time since I was using a bigger wreath and knew I'd be wrapping yarn around that sucker twice as much as that smaller fall-ish one. And last, but good gravy not least, you'll need a handy dandy glue gun.
 Attention: if you plan on using a straw wreath like I did, you will want to start this project outside. Don't even think about unwrapping that bad boy inside your house. I mean it. If it's freezing cold where you live and crafting outside is not an option, then this project is not for you. After removing only a 2-inch section of the plastic wrapping in my living room, it looked like I'd massacred the Scarecrow from the Wizard of Oz.
Now, since that's out of the way, let's get started.
Take your yarn and begin wrapping. Wrap a few times over your loose end to secure it.
 And then, just keep on a'wrappin.
 It helps if you have a little boy ride circles around you on his big wheel...
 Half way! Wa-hoooooo!
 Get this close to finishing and run out of yarn.
 Make this face because you almost bought 2 things of yarn instead of 1, but put the second one back before checking out because you were sure you just needed the one.
 Drive back to Wal-mart the following day after school only to realize they're out of the color you need. Wait til that night, load all 3 of your kiddos into the car, drive across town to the other Wal-mart, unload all 3 kiddos, find the right color yarn, hand it to the lady in the fabric department because your baby is screaming because she's hungry and you can't take merchandise into the bathroom with you, realize there's no hot water in any of the bathrooms at Wal-mart so you can't make a bottle, get your yarn from fabric department lady and proceed quickly to the check-out because your baby is still crying (screaming). Check out holding your baby in one hand while you pay with the other because that's the only way she'd stop screaming. Load all 3 kiddos back into the car and drive home. Whew.
Finish wrapping wreath and secure other loose end with hot glue.
Onto rosettes. It's time to decide what colors you want your embellishments to be. I'm sticking with the colors from my ribbon trees, in fact, even using my leftover ribbon, and some other green fabric I bought as a remnant for 99 cents. If you're using fabric, cut it into long strips about 2 inches wide. Like this:
 (I'd like to thank little old rocking chair for modeling my fabric strips)
Next, cut your felt into circles about 3-3.5 inches in diameter. These circles will be the base for your rosettes.
 For my first rosette, I used the pink ribbon from yesterday's tree and added a bit of pink tulle. This of course is optional.
 Take your ribbon (or fabric) and turn down the end, like this:
 Place a dot of glue onto the center of one of the felt circles and attach the end of your ribbon, like this:
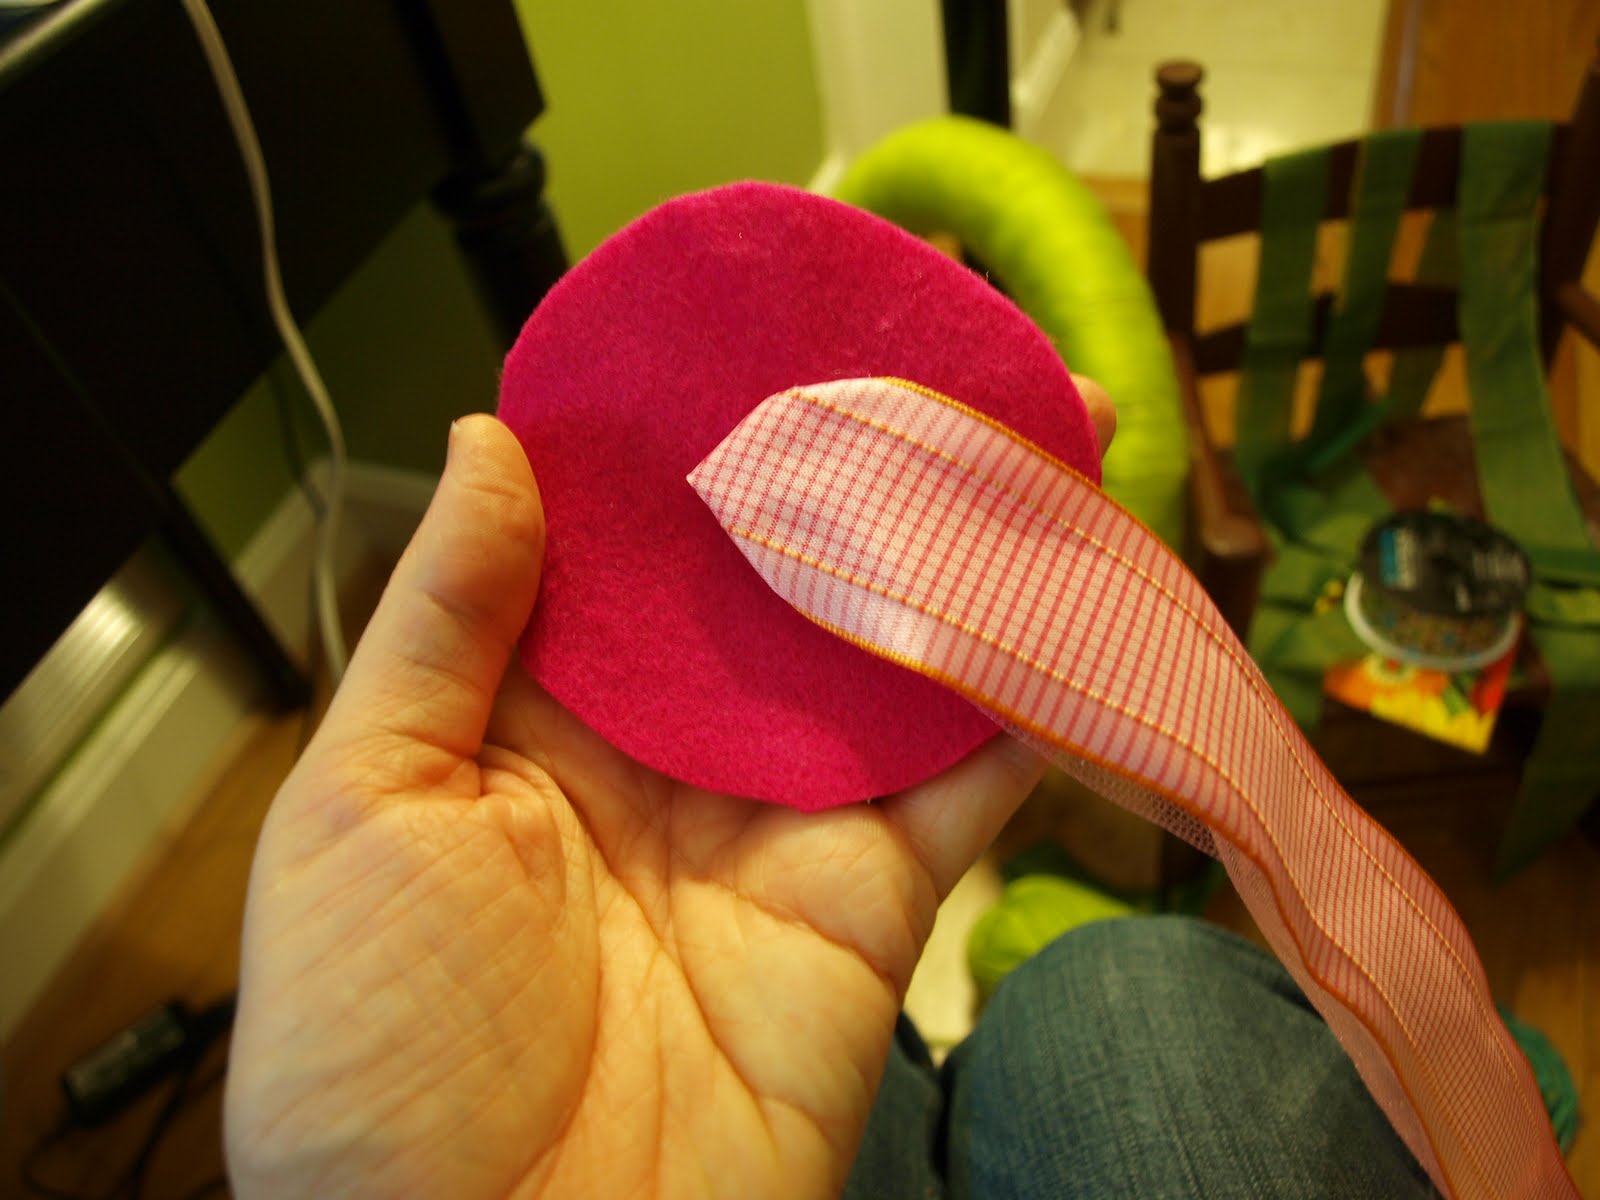 Now twist the ribbon and attach with a little bit of glue.
 Keep twisting and glueing....
 Until you have something like this:
 Just cut off the long end and attach to the back of the rosette, like this:
 And voila. Done. Easy-peezy, right?
I made this pink one, and one from the green/turquoise ribbon from my other tree.
 If you're using fabric, the instructions are the same:
Glue, twist, glue, twist....come on, say it with me- GLUE, TWIST, GLUE, TWIST....
(fun, isn't it?)
 I wanted my fabric rosettes to be a little smaller, so I stopped when I got here:
 Just cut off the excess felt....
 And you've got a beautiful, slightly smaller, rosette.
 I love how the ends of this one look like little leaves. Just had to share.
 Moving along. Now you have your wreath and your rosettes. I made 5 for mine, but you can certainly have as many or as few as you'd like.
 Hot glue those babies down as soon as you've decided how you want them arranged on your wreath, and....
VOILA.

 Doesn't it look pretty with my trees? Hmmmm???


 Doesn't it look pretty with my trees? Hmmmm???
And that's all she wrote, folks. Done. If you're stumped on what you'd like your wreath to look, just go to etsy and type 'yarn wreath'. There's a bajillion options that might inspire you. Also, did anyone happen to count how many times I typed the word 'wreath' in this post. I think it was also a bajillion.
I'm linking this post over at Today's Creative Blog. Check out the other entries!
Until tomorrow.......


6 comments:
I love reading your posts! I mean, the subjects are great, but your writing is fantastic! And so entertaining! So glad you're doing well, friend! Miss you!
Amen about the poor little scarecrow! I did this with the door wreath for ESP...Todd was NOT pleased with the outcome. I love the way yours turned out. Just curious, I've only used the straw wreath form...do you think the foam type was easier?
You are so flippn' crafty! I'm going to try this!
would definitely rather work with the foam wreath form. The straw worked out just dandy, but made a flippin mess. Not to mention the fact that I got a few splinters...
this is beautiful!! love the colors and the funny story, but not really funny because i've been there and it's not anything to laugh at.
Thanks for the flower tutorial!
Post a Comment