
Hello friends! What a beautiful day this is! Can you see me smiling? Can you? Wanna know why I'm so happy and chipper this morning? (despite the fact that I've had no coffee)
E slept in her bed last night.
ALL night long.
So did MM.
No waking up to eat (for MM)
No waking up to scream (for E)
Thank you God.
Now...onto some craftiness-
Oliver and I were on a mission yesterday after school to finish ALL of my Christmas shopping, which wasn't much, but still...wasn't finished. We went 6, yes SIX places as fast as my car and our feet would carry us checking things off of my list, until we ended up at our final destination (eww..just thought of that movie) which was the hob lob. I needed some ribbon to make rossette hairclips for a friend and I was also hoping to come across some awesome goodies I could pick up for O's teachers. We'd already checked his Kindergarten teacher off of our list, but I wanted something for all of those other teachers that he spends time with during the week- art teacher, P.E. teachers, librarians, etc...
We looked and looked and looked, and everything I found was either too expensive OR there weren't 6 of the same thing. (that's how many we needed) My goal was to give them something they would definitely use, so I found cute potholders (too expensive at 3 and 4 bucks each), reed diffusers (only had 4 left of the same size), cute Christmas aprons/towels (even at 50%, they were still too much moolah). Just as we were about to leave, we passed an endcap with packs of blank notecards on it.
(cue angelic music from above)
A fabulous idea came to me....
The pack of notecards had 50 in it-
I could stamp each teachers last initial on the front of 8 cards, tie it up real pretty-like, and boom.
Teacher gifts taken care of.
I grabbed up a pack of cards faster than you can say POW, and we skeedadled to the register.
Here's how it all went down:
the notecards were 6.99 and NOT on sale, but have no fear- I pulled up their 40% off coupon on my trusty iphone, and WHAM. Now they're $4.20, making each set of 8 cards roughly 70 cents a piece.
Did you hear that?
SEVENTY CENTS A PIECE.

Here's what I used:
1 pack of 50 blank notecards
some acrylic stamps I already owned
some ribbon left from last year
a pack of 6 mini ornaments that I picked up at 50% off.
They were regularly 1.99, but I paid .99 cents for them.
(Not that you couldn't have done that math on your own...)

Here's a close-up shot of the ornaments, which I thought would help dress up the wrapping of the notecards.
Cute, huh? And at 16.5 cents a piece, why not?

notecards.
as if you couldn't tell.

Now...I know that not everyone will have acrylic alphabet stamps at home, BUT I also could have printed my letters on the computer, punched them out with a circle punch OR cut out by hand, and attached to the front of the cards. There really are several ways to make this idea work.

This was another option I had, but I went with the first alphabet. They were taller and I'd never used them.
So there.

Next I pulled out some inks I've had for a while- they're Martha Stewart craft inks from Wal-mart, and they were super cheap. Don't remember how much exactly, but did I mention they were from WAL-MART?

I made a list of the six teachers names, you know...so I wouldn't mess up, and I started stamping.
I chose to place the initials on the bottom right corner of each card, but you could place them anywhere. I also had cute circle stamps that would have looked so great around each of the monograms, but by the time I started this project, it was already 10 p.m. So....a simple monogram it is.

Quick tip here: dab the ink onto the stamp. NOT the other way around- as in dab the stamp on the ink. This way, you can tell exactly where the ink is going. I do this for rubber stamps too, not just acrylic, and I've always had better results this way.

BOOM.
six sets of monogram notecards done.
But that's not where it ends. OH NO... I have more.
It's another FREEBIE, my friends. Check out these awesome tags-


They came from HERE.
It's a company called Jones Design Company and there's lots of lovely goodies to look at.
It's a company called Jones Design Company and there's lots of lovely goodies to look at.
I simply grabbed some white cardstock that I already had on hand and printed away.
I printed enough to use on ALL of our Christmas gifts because I liked them so much.
And oh, by the way...did I mention that they were FREE?
Here's another set of freebie tags I found on Our Humble A(bowe)d's blog.
Amanda Bowe (cute blog title, huh?) also has lots of great DIY projects and tutorials on her blog, so check her out.
Here's another set of freebie tags I found on Our Humble A(bowe)d's blog.
Amanda Bowe (cute blog title, huh?) also has lots of great DIY projects and tutorials on her blog, so check her out.


After tying with ribbon, attaching the tags and the cute little star ornaments, this was the result...


Not too shabby for a .86 cent gift, huh?
Now, I mentioned that we already had his classroom teacher's gift taken care of, but you know me-
I had to add a little homemade goodness to it. I picked these plain white dish towels up at wal-mart a while back-
(sorry this pic is uber-white. I was playing with the settings on the SLR. Still not quite sure how to use it NOT in the auto mode)

Also found this remnant of houndstooth fabric in one of my happy spots.
(the remnant section of the hob lob.)
Anyone else love finding a good remnant, or is that just me?
Just me, huh?
Ok....
Moving on....

And yes, it was a whopping 52 cents. It also just happens to have already been the shape I needed- a nice LONG strip. I wanted to add a little houndstooth goodness to that plain dish towel, so....
I cut a strip about an inch and half long, and sewed right down the middle. (the length was about a yard and a half long when I started, but it didn't take nearly that much)

After I sewed down the center, I pulled just one of the threads to gather the fabric into a ruffle.
(thank you Erin Schmidt for the fabulous tip!)

Sewed my ruffle onto the towel about 2 1/2 inches from the bottom, and
BOOM.
Pretty houndstooth ruffled dish towel.
I attached it to the monogrammed cutting board that we'd already purchased for his teacher, and there ya have it folks.
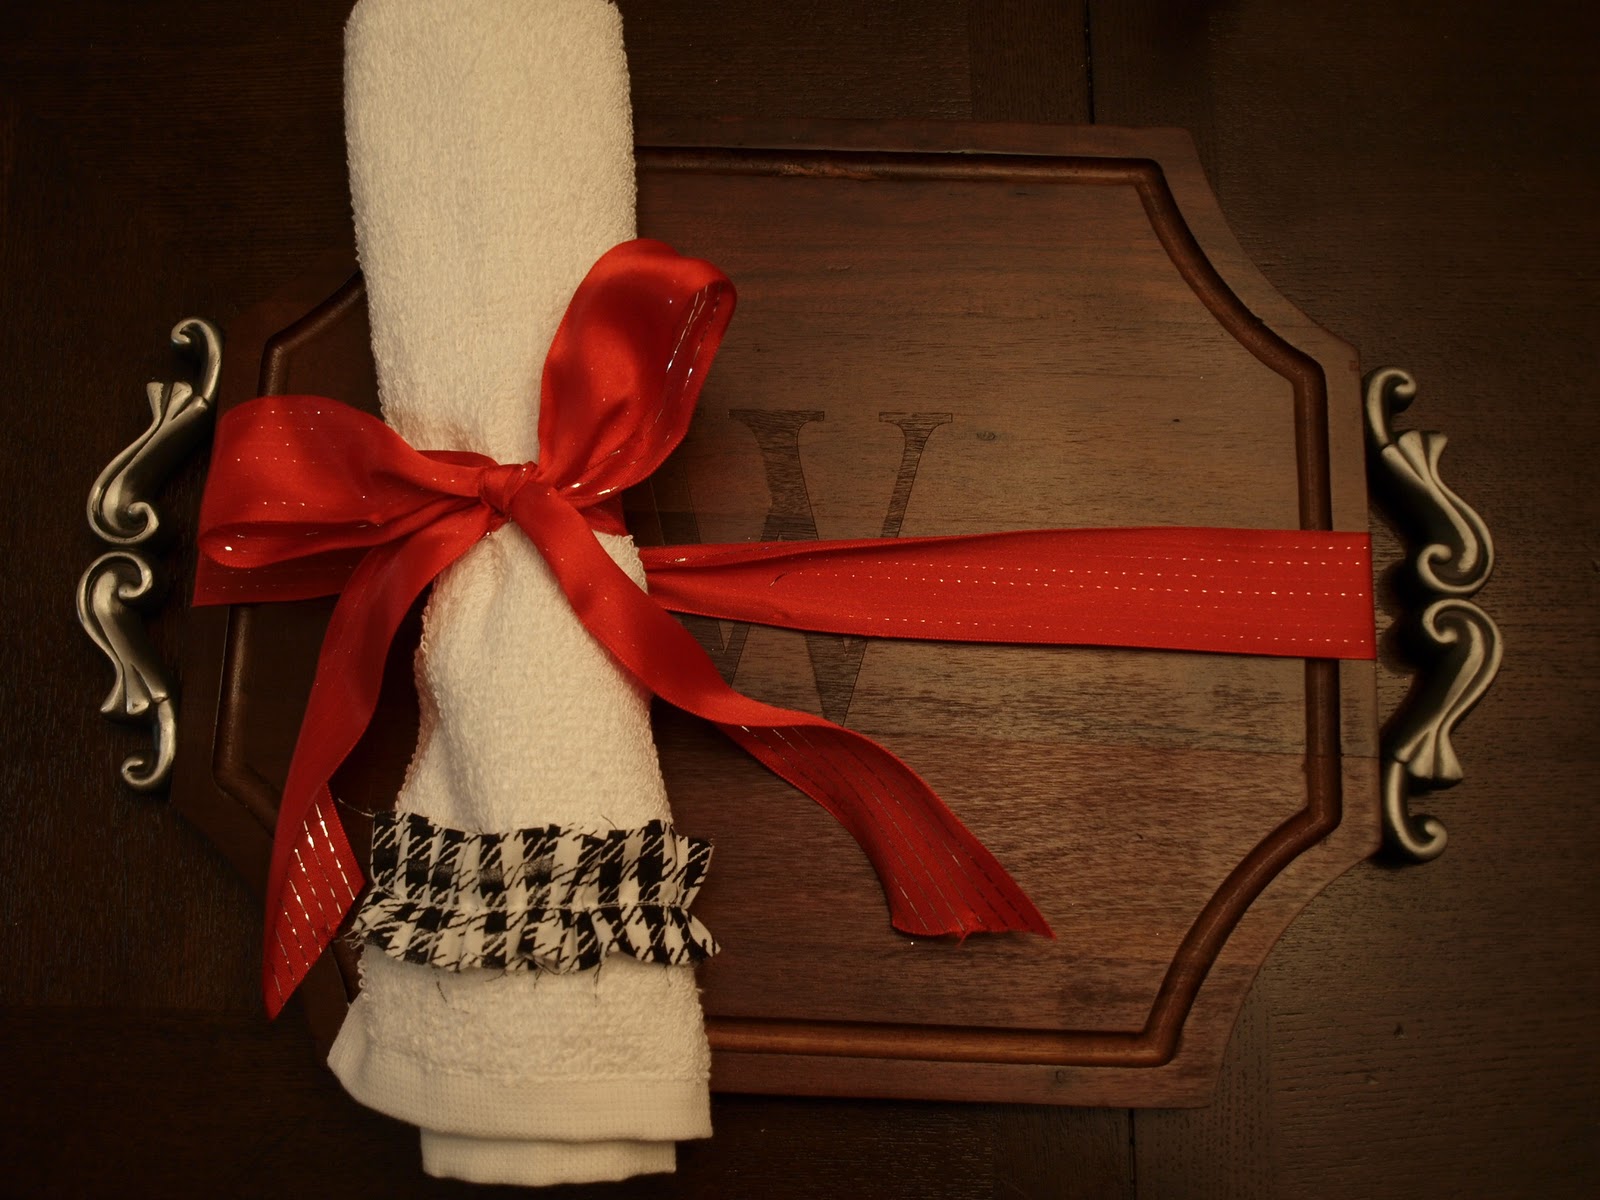
Teacher gifts taken care of and I didn't spend all of our precious diaper money!

Now, I found pics from last weekend on the big camera that I'd forgotten about, so I have to share.
How cute is MM all decked out for Christmas?

And here's me being silly with the self-timer.
I think this was date number 2 from last weekend.
Doesn't my hubs look dapper?

Well that's all for today, folks.
Hope these ideas inspire you to make something cool.
I also hope that you don't ever find yourself in the hob lob 5 days before Christmas.
It was madness, I tell you.
Pure madness.
This post is linked with All Things Heart and Home's Merry and Bright linky.
Check out tons of other great ideas by clicking the button:


3 comments:
Did you have to get your calculator out to do that math sis?
GREAT job on the teacher gifts - acrylic stamps, what are those??? I think I might need those? :)
Hi - I'm stopping by from The Shabby Chic Cottage. Those teachers gifts are awesome! I love the font (stamp thingy) you chose - I'm sure the teachers LOVED them.
Post a Comment